Hello, my dear colleagues! Using videos in the classroom is really nothing new, and ESL teachers have been using videos for decades – we just love videos! However, we rarely have activities where we actually make videos in our classroom, either individually, or collaboratively. This post will share 10 collaborative ESL activities with video and also a couple of picture-based tutorials for some of the activities. You can make great videos in your classroom for free with many tools, but for this article, we have selected the InVideo video editor. Without further ado, here are our 10 creative and collaborative video-design activities you can do in your classroom with almost no-prep tomorrow!
10 collaborative ESL activities with video in your classroom
1. Explainer videos
Explainer videos are the most common videos in the classroom after screen recorded videos. For a good explainer video, we need a nice contrast between the letters and the background, and readable fonts. To make the explainer videos more meaningful – switch roles. Have students make the videos for the class, and act as a mentor. You can visit your IT classroom and use the computers there, or if you are working online, even better, all the students will have their own devices already. Separate the students into groups and have them make explainer videos for different things until you have explainer videos for the full unit. The video authors can be anonymous, and you can have a discussion lesson to discuss the information and the design – you can do a very subtle formative assessment while they are discussing.
Since many of the students are in the entrepreneurship mode already, putting their ideas to use to design a service and/or a product is a great idea. Students have many amazing ideas and love making up products! Finalize your product design by making a product/service promotional video for their social media of choice. Have them compete for ‘funding’ in front of ‘investors’, as real entrepreneurs pitch their ideas. The investors can be another class, and then they can shift places. An amazing chance to collaborate competitively with another class, and learn some skills that can be used in real life.
3. Add a voice-over to practice your speaking skills
Voice-overs give students a chance to write their script, and not focus on how they look on camera or their surroundings, which puts an accent on the video in front of them. I’ve done audio interviews and many similar activities with my students who are not comfortable with showing their faces on camera. Let’s face it – teachers also need a camera-off day sometimes. Here are some easy instructions on how to do voice-overs directly in the editor.
Step 1: Once you have added your video to the InVideo editor, click the Voice Over button on the dashboard and select Record Voice Over.

Step 2: When you’re ready, click on the red Record button. After a quick countdown, you can begin recording your voice-over. Ensure you have your script in front of you so that you can avoid fumbling and awkward pauses. When done, click on the red Stop button to end the recording.

Step 3: Next, you can preview your recording by hitting the play button to check for quality or hit the Record button to record again. If you’re satisfied with the output, click on Add at the right-most corner to add the recording as a VO.

Step 4: Your recorded voice-over will appear at the bottom of your dashboard. The best part about recording a voice-over using the InVideo editor is that you can record in parts and move the cursor/seeker to begin recording where you left off.

You can also choose to trim, loop, duplicate or adjust the volume of your recording by clicking Edit on the recorded voice-over.

Once done, you can click on Download & Share at the top right corner to export your video with the voice-over.
4. Make a short portfolio video to showcase what you did each month to parents
All of the individual work from my class is stored in our learning management system – Class Dojo. It can easily be downloaded and ordered in a template, where a student can do a voice-over and share with parents what they learned. It definitely helps students who are a bit introverted since they don’t have to show their faces, and it is a great way to self-assess and promote the use of formative assessment in the classroom. Organizing all the worksheets, photos, and written material in a video form would also show the students’ progress more realistically. I honestly think most of them would get shocked by how much they actually learned, and it’s probably one of the most useful ESL activities with video on this list.
5. From photos to vertical videos
Photos from many different collaborative projects can be easily included in a video format to present the project, learn how to use a video-editing tool, and also make the photos less static and tell a story. Vertical videos are very popular on multiple social media now, and students might feel more motivated since they don’t feel as much as homework when done on their phones. I specifically asked them this, and they said they prefer to make vertical videos. Since photos taken on phones are mostly vertical, this example will illustrate making a vertical video from photos.
6. Cinematic slideshows & QR codes
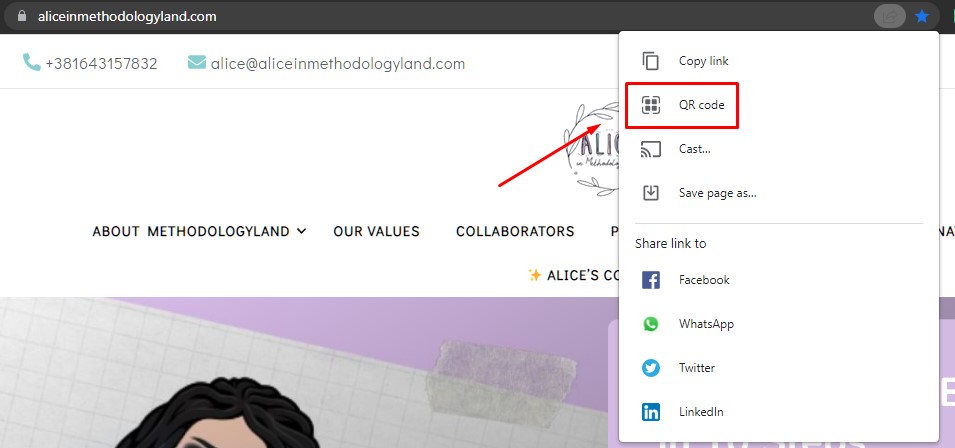
Most slideshows are pretty flat, and adding transitions definitely makes them come to life. Cinematic lesson slideshows and presentations can be used as a revision and they can be made by both teachers and students, and voice-overs can be added directly to the editor. If you want to take it to the next level, add a QR code for homework or further reading resources to make the video even more interactive. I’d personally stick a QR code to everything. If you want to get a QR code for any websites and you are using Google Chrome, you don’t need any external apps anymore – just follow the instruction in the screenshot below.
7. Meme review videos
Young students in my school love memes, I love memes, everyone loves memes. We shouldn’t really discuss that at all at this point. I saw a Twitter thread with a professor giving extra credit to students who showed historical events through memes, and the same can be done with grammar. Multiple memes about one tense can be combined to make a funny instructional grammar video – a project I honestly can’t wait to start with my students because every time we come across something weird in English (read every day!) we say how English hates all its speakers and just wants to torture us. ? InVideo has a meme generator included in the editor, which makes it easy to create something even if you have literally never heard of memes.
8. Instructional videos for other students or parents
When it comes to instructional videos (from homework to class information and how to use digital tools), usually teachers make these videos. We just skip the students and usually go straight to parents, and maybe we shouldn’t do that. By giving the student a task to do a short video tutorial on how to use a classroom app to parents, the student will have to explore it and then make a video. Again, the students don’t have to have a screen recording tool, they can just hold their phone camera and record the screen. It’s not perfect, but it will most likely be more simplified and easier for other children and/or parents to understand. I sometimes find myself overcomplicating things and making those tutorials longer than I should out of fear of skipping important information.
9. Local travel guides
If all of your students come from the same city, then you can separate them into smaller groups and have them cover specific parts of a travel guide (history, gastronomy, city life, traditional culture, etc.) This way, you will get a more in-depth collection of videos about one place. In this case, students can record themselves with their phones and then add text to the video editor. If they are not confident enough for that, adding just photos and animating them as we discussed above is also great. I encourage real photos taken by my own students, rather than downloading photos online to make the travel guide more authentic.
If you are teaching ESL online, this experience is even richer, since you can do more activities and each student can make one video! I have students from all over the world and each local travel guide features another country, which is a great project to do in your online classroom.
10. Weekly news segment from your classroom
I am already doing this on my school Instagram page to share the most interesting things we’ve done in a week, but I plan to ask students to add their short videos and comments to see how things look from their side. It is a short video form, with funny, honest moments, not a portfolio-type activity. If the students are more tech-savvy, they can edit the videos themselves (just simple text or anything similar is fine.) I will share examples of this activity as soon as we do it.
Whatever we may feel about digital tools and distance learning, we still have to agree that teaching is a profession that constantly gets innovated, and video content and activities in the ESL classroom are here to stay. Have you ever tried the InVideo video editor? Feel free to share your experience with using video and video editors in the classroom in the comments, or via the contact page!

Click here to explore Alice’s store where ESL materials are forever free!
All the materials except lesson plans and 30+ page interactive activity books will be free FOREVER! Why? Because sharing is caring, and the last couple of years haven’t been kind to all of us.
Don’t forget to leave a review when you download materials! It’s just a minute of your time, and it means a lot to Alice as a material designer.
P.S. The store and the freebie library are not the same thing – the freebie library has some extra materials like conference presentations and webinar recordings which are not available in the store
The subscription link for the store is below the author’s bio in every post.

*Our posts may contain affiliate links, which is one of the ways we can keep going as an organization.